
How to clean a mechanical keyboard
Do you know how to clean a mechanical keyboard? If you have upgraded to any of the best mechanical keyboards then it is definitely worth finding out about the correct maintenance and care of your new investment. That way, you can use it for years and rest assured that it’s free of dust, hair, and other debris.
While wiping down your mechanical keyboard from time to time can help keep it germ-free and fairly clean, you should also give it a thorough cleaning at least once a year. This involves removing the keycaps, washing them and cleaning them with cotton swabs between the keyboard switches. This takes time, but your mechanical keyboard will feel like new once you’ve completed the somewhat lengthy process of deep cleaning.
Mechanical keyboards are more expensive than membrane keyboards because they offer a much better typing and gaming experience. Therefore, you want to take care of your mechanical keyboard and keep it clean.
How to clean a mechanical keyboard from start to finish.
How to clean a mechanical keyboard
- Disconnect your keyboard
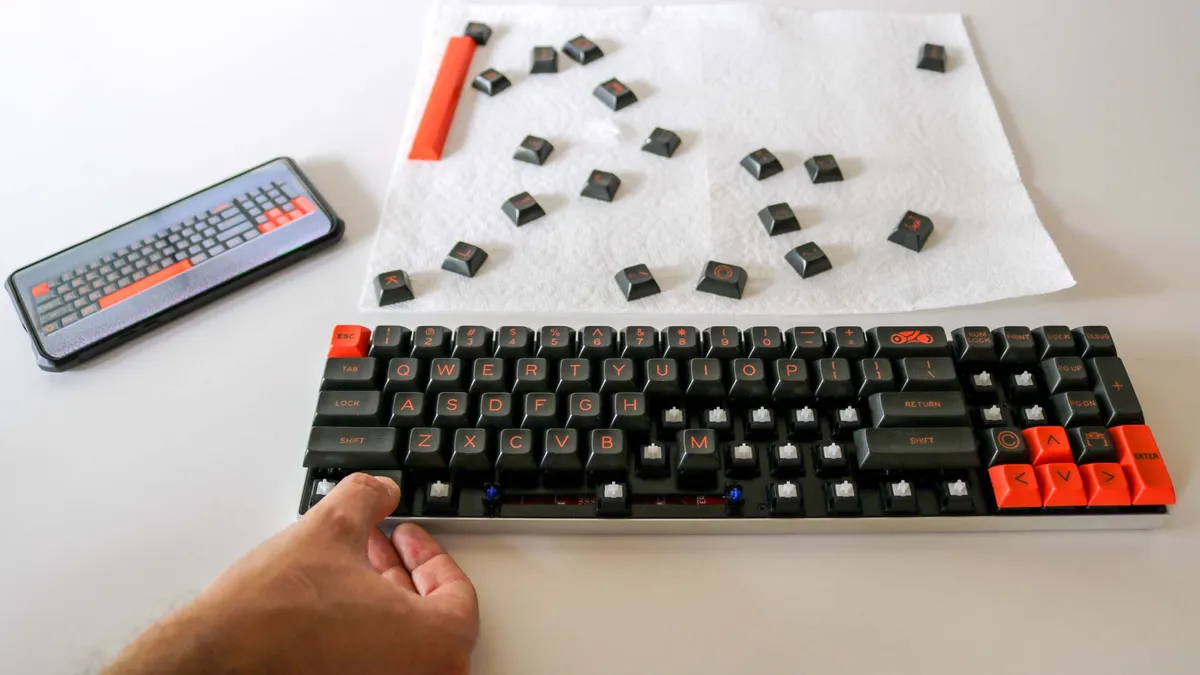
- Take a picture of your keyboard for reference
- Use a keycap puller to gently remove all keycaps
- Wash your keycaps in warm water and let them dry
- Blow off dust with compressed air or an electric duster
- Use cotton swabs and alcohol to clean between switches
- Put your keycaps back on
- Test your keyboard
Read on for detailed instructions for each step.
1. Disconnect your keyboard. Carefully Disconnect your keyboard from your computer and Disconnect the cable from your keyboard if it is detachable.

2. Take a picture of your keyboard for reference. When you’re done cleaning your keyboard, you’ll need to put the keycaps back in their proper places. To facilitate this, Take a picture of your keyboard before you start removing the keycaps.

3. Use a keycap puller to gently remove all keycaps. With a Keycap Pullerbegin Removing the keycaps from your keyboard and put them in a bowl so you don’t misplace any of them. If you don’t have a keycap puller handy, you can easily make one with a pair of paperclips, a cable tie and a pair of pliers (opens in new tab).

4. Wash your keycaps in warm water and let them dry. Take the bowl with all your keycaps and Fill it with warm water and some washing-up liquid. Move the keycaps with your hands and Let the bowl sit for 30 to 60 minutes.

Once the keycaps have had enough time to soak, you can do so Use a strainer to remove the soapy water. Rinse the keycaps thoroughly and lay them out to dry on a paper towel.

5. Blow off dust with compressed air or an electric duster. While your keycaps are being soaked or dried, use a can of compressed air or even better, an electric duster to remove dust, hair or other debris from your keyboard.

6. Use cotton swabs and alcohol to clean between switches. With some cotton swabs and isopropyl alcohol Carefully clean the gaps between the switches on your keyboard. Remember you want it Use as little isopropyl alcohol as possible to avoid damaging the circuit board of your keyboard. Thereafter, Allow your keyboard to dry However, you can speed up this process with an electric duster if you have one.

7. Put your keycaps back on. With the Reference photo of your keyboard You took earlier, start carefully Put your keycaps back on. Assure yourself Every button is properly aligned and Press firmly on your keycaps to reset them. It’s also a good idea to have your keycap puller handy in case you make a mistake.
8. Test your keyboard. Now that all the keys are back on your keyboard, Connect it to your computer and Test all keys. You can use the site Keyboardtester.com (opens in new tab) to do as one makes audible click every time a key is pressed and indicates which keys have been tested.

If you want to learn more about mechanical keyboards, check out this guide to mechanical keyboard switches, or maybe you’re just wondering why you want a mechanical keyboard in the first place. Do you have a membrane keyboard or laptop keyboard that needs a quick clean? How to clean a keyboard in less than 5 minutes.