
How to convert a child account with two-factor authentication to an adult account
As hard as it is for me to believe, my older child recently turned 18. Coming of majority in the US means you are now able to take charge of — and be personally responsible for — much more of your life than my spouse and I did for them. This includes online accounts that we set up for them with entities such as government agencies (for passports and ID), Amazon and the like.
With two-factor authentication (2FA) recommended or required in many locations, what’s the easiest way to shift control from you to your child while maintaining security? Here is a general set of steps based on Apple operating systems and iCloud Keychain.
Sign in to the account first.
Next, copy your child’s account information:
- Stored Passwords: With passwords stored in your keychain on an iPhone, iPad, or Mac (or synced through iCloud Keychain), you can share the entry with your child. This varies by OS version and version. On iOS 15/iPad 15, go to settings > passwords, find the entry and tap the share button; In macOS 12 Monterey, go to either system settings > passwords or safari > settings > passwords, locate the entry, and click the Share button. Use AirDrop or another method to send it to your child.
- Third-party password managers: With 1Password or other password managers and a shared vault enabled, you can copy or move the entry to that shared vault. You may also be able to share an entry from the app that can be opened with a free or paid version of the app your child has installed. (Warning! I strongly advise against using Google Chrome’s password manager as it lacks the end-to-end device-locked security provided by iCloud Keychain and major third-party password managers.)
- Read passwords aloud: You can also literally read the password out loud and have your offspring repeat it for accuracy. (As before: read to your child.)
Before proceeding, have your child create an account in their password manager app — including passwords in iOS, iPadOS, or macOS — so they can add a verification code in a next step. But you don’t have to register yet.
Update related data in the account:
- E-mail: If you used an email address under your control to manage your account, it’s time to migrate it. Change the email address. You may need to change both an account sign-in address and an email address used to send messages (some sites manage these separately). Wait to submit all account credentials before clicking a confirmation email link to avoid losing access while you’re still switching the account.
- Telephone number: Change the phone number to theirs. They may get a confirmation call or text that they can read or show you and you can confirm right away.
- Postal address: Update the mailing address if they have moved or are about to move.
Finally, move second-factor authentication to accounts that require it. If you’re on a site that allows multiple 2FA authenticators who can create a TOTP (time-based one-time password) for verification, the next step is to add their authenticator.
- Choose to add an authenticator.
- Name it meaningfully if you have an option (which you usually do).
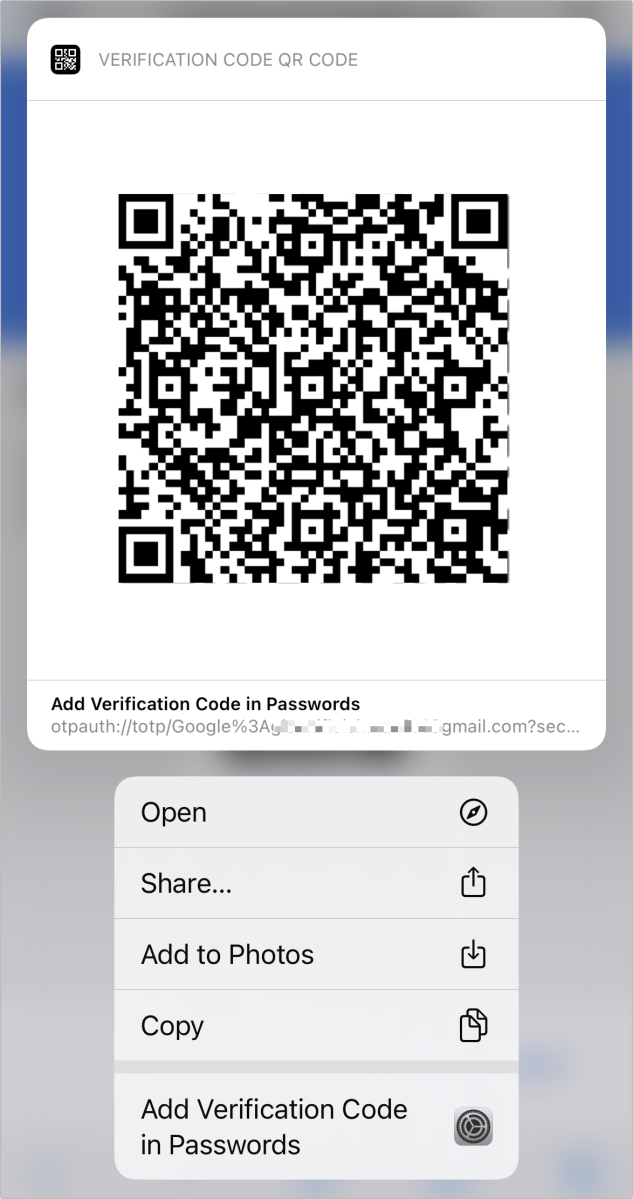
- The page displays a QR code and usually the corresponding “seed” text (a shared secret) for the token. Your child can use an authenticator app (I recommend Authy), a third-party password manager with TOTP support like 1Password, or Apple’s built-in TOTP recognition system. If they have an iPhone or iPad, an authenticator or password app opens a camera view or uses the camera app to add them to an Apple-managed login. If not, you can read the seed code out loud and enter it in the appropriate place. (See below for more on Apple’s approach.)
- The authenticator app or component generates a code on your child’s device, which you then enter to confirm correct registration.
- Delete your authenticator and sign out.
For sites that don’t allow more than one authenticator, disable 2FA, sign out, and let your child sign in with the account and password (confirm a new email address first, if required via an email link), and then help them register 2FA if they’re unfamiliar with it.
Apple supports TOTPs — it calls them “verification codes” right in iOS 15, iPadOS 15, and macOS 12 Monterey and later. In iOS 15/iPadOS 15, you can use the Camera app to point to a QR code and then tap an on-screen link to add the verification code. You can also touch and hold and select a code on a web page or in an email Add verification code. In Monterey, you can control-click or right-click a QR code on a webpage to add it. However, you can only add a verification code to an existing account, so make sure your child has created the account entry early in the process as mentioned above. (See this column for a more detailed explanation of how to add verification codes in iOS, iPadOS, and macOS.)
Your child can now erase all remaining traces of you from their account or continue to have you as their “rescue email” or “trusted phone number” or similar if they want to have a backup for account access recovery in addition to the options provided by the service provided.
Also Read: How to Create an Apple ID and How to Set Up an Apple ID for a Child.
We also explain how to change your child’s adult Apple ID account to a child account.
Ask Mac 911
We’ve compiled a list of the questions we get asked most frequently, along with answers and links to columns: Check out our Super FAQ to see if your question is covered. If not, we are always looking for new problems to solve! Email yours to [email protected], including screenshots if necessary and whether to use your full name. Not every question will be answered, we do not respond to emails, and we cannot provide direct troubleshooting advice.