How to Delete a Service in Windows 11
A service is a special type of program that usually starts when the operating system loads on your computer. The application runs in the background and has no user interface. You don’t see these processes when you use your computer. Instead, you can observe the effects as they run in the background.
If you’ve identified a service that you no longer need on your computer and want to remove it, you can delete that service. This guide explains some easy ways to delete a service in Windows 11.
What is a service on Windows?
Windows services are applications that start with the Windows operating system and perform a specific function. Services can be used to provide functionality to other programs or to perform system-level tasks. It is responsible for such tasks as monitoring the system for changes, interacting with other programs, and running scheduled tasks.
A typical Windows system runs a number of services, and more can be added as needed. Some services are essential for the proper functioning of the operating system, while others may be added by third-party programs.
You can view and manage services from the Windows Tools applet in Control Panel. When a service isn’t working properly, it can cause problems with other parts of the system. For example, if the print spooler service stops responding, you cannot print documents.
Can disabling services improve Windows performance?
It’s a well-known fact that disabling services on Windows can improve performance, which is indeed true. However, this is not always the case.
In some cases, disabling certain services can actually result in decreased performance and stability. Therefore, it is important to know which services are safe to disable and which ones should be left as they are.
How to delete a service in Windows 11
When you delete a service, you permanently remove it from the Windows operating system. This means that the service will no longer be available to programs that depend on it, and all associated data will be lost. Before you delete a service, you should make sure that no programs depend on it. You can do this by checking the Dependencies tab in the service properties window.
However, it’s always a good idea to disable unneeded services, which will speed up Windows performance and make your computer more stable. When it comes to deleting services from Windows, there are three different ways to do it.
You can either do this from Command Prompt, Windows PowerShell, or Registry Editor, whichever you prefer. Each of them is explained in detail here.
1. Via the registry editor
If you are familiar with the Windows registry and want to delete a service in Windows 11, you can do it using Registry Editor. The process is relatively simple and only requires a few steps.
However, remember that editing the registry is a delicate process and one wrong step can render your computer unusable. In this regard, you should always create a backup of your registry before making any changes.
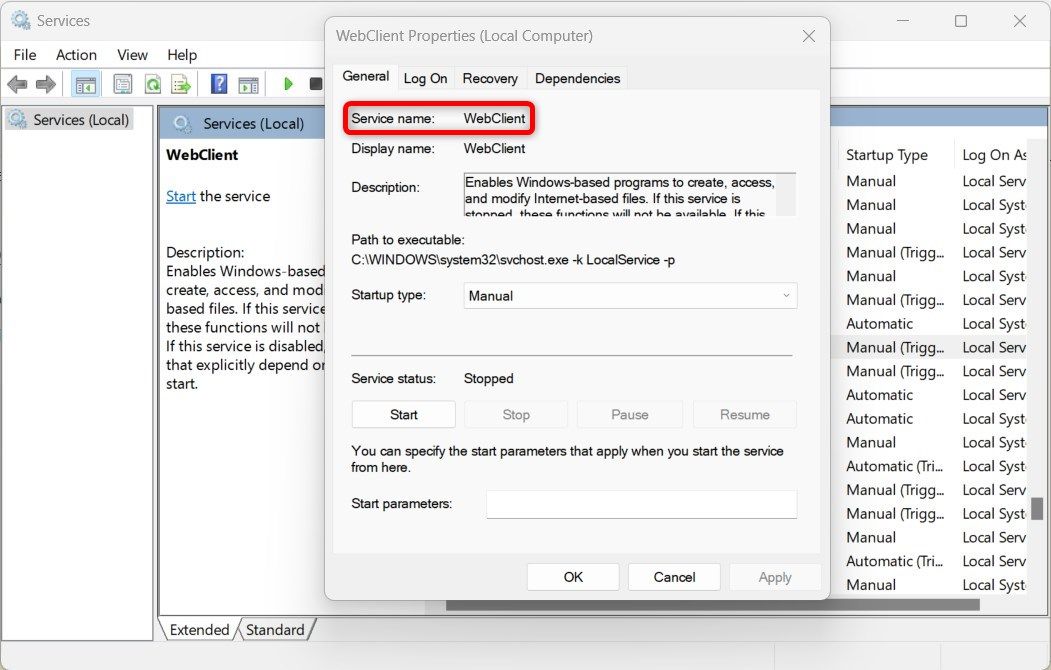
The instructions below will walk you through deleting a Windows service using Registry Editor, but before proceeding you need to identify which one you want to delete. First, do the following:
- Open the Services application.
- Scroll down and find the service you want to delete in the Services Manager window.
- Once you find it, double click on it to open it Characteristics Window.
- In the Properties window, switch to the General and note the service name.
After finding the service name, close the Properties and Services windows. Next, open the registry editor and delete the service as follows:
After deleting the registry key, restart your computer for the changes to take effect. The next time you start your PC, the deleted service will no longer be available to you
2. Using Command Prompt
If you don’t want to edit Registry Editor, you can also delete the service from Command Prompt in Windows 11. To continue with this method, you need the service name, so please refer to the first method to find it.
To delete services from Command Prompt:
- Open the barrel command dialog box.
- Type “cmd” in the text box and press Ctrl + Shift + Enter to open the command prompt with administrator access.
- When UAC appears on the screen, click Yes keep going.
- Once in the Command Prompt window, enter the following command:
sc delete <service_name> - Now press Enter to delete the service.
- After making the above changes, you need to restart your computer.
When you run the above command, replace
3. Using Windows PowerShell
Windows PowerShell is another method that you can use to delete services in Windows 11. Thats how it works:
- Click on the Start menu and type “PowerShell”.
- Select in the right pane Execute as administrator.
- When UAC appears on the screen, click Yes keep going.
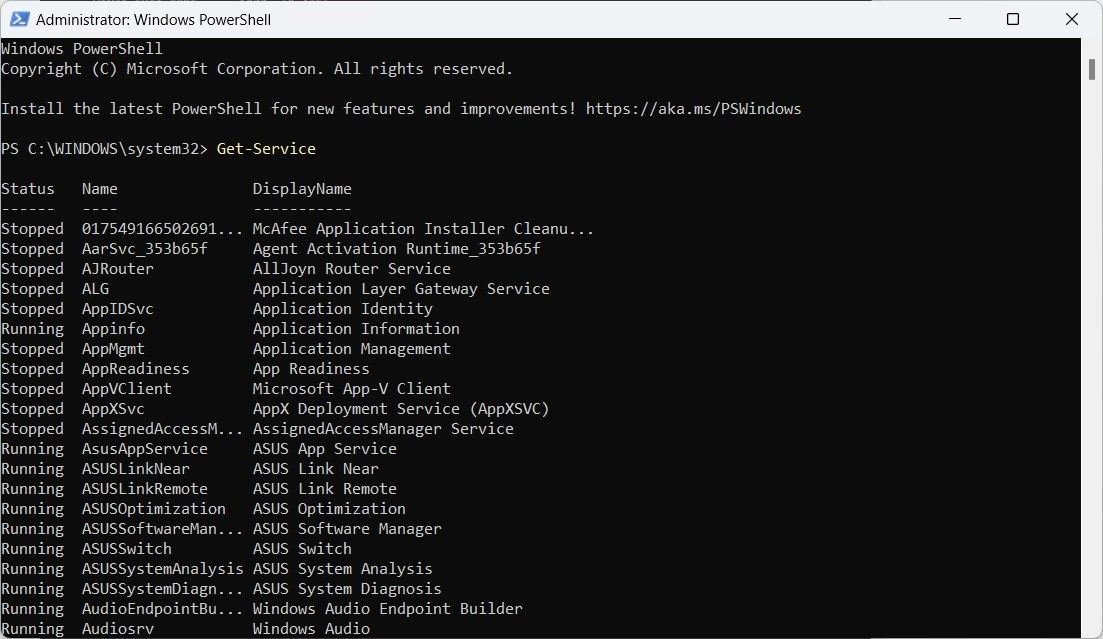
- In the PowerShell window, enter the following command:
Get-Service - Press Enter and the list of services will appear on your screen.
- Note the name of the service that you want to remove from the service list.
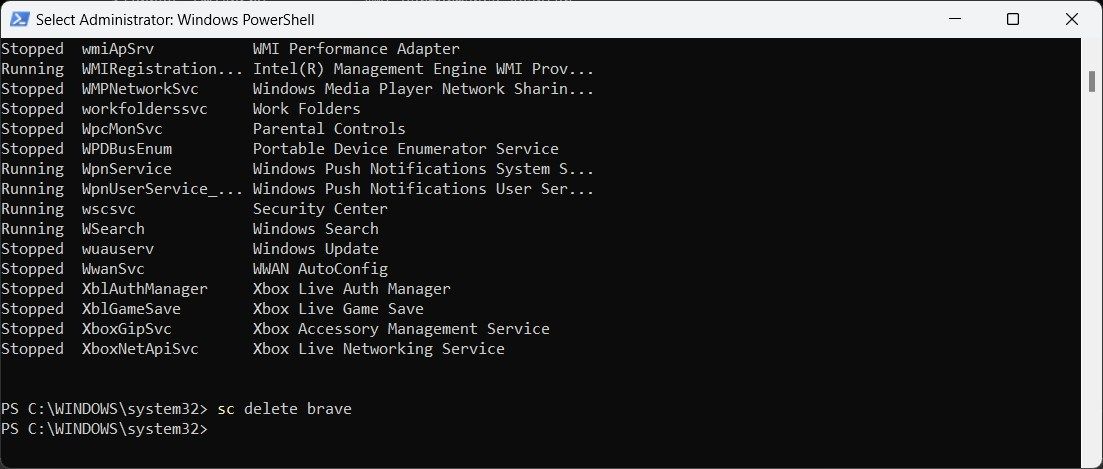
- Now copy and paste the following command:
sc delete <service_name> - Press the Enter button to execute the command.
- Once you make these changes, restart your computer and this service will not appear in the services list.
Replace in the above command
Delete a Windows service with ease
If you find that a Windows service is no longer needed on your computer, you can delete it using Registry Editor, Command Prompt, or Windows PowerShell. Be careful when deleting services as some may be required by other programs or your computer to work properly.


