
How to get the classic breakbeat sound in your DAW
Last week we dug deep into the History of breakbeats in music productionlooking at how artists and producers in the early days of hip-hop and jungle turned sampled breaks from vinyl records into beats that laid the foundation for new genres of music.
Then we’ll show you how to work with breaks in the modern DAW, taking advantage of the nearly endless possibilities that contemporary music technology offers. First we slice up a sampled break and rearrange it to make it our own. If you’re missing the breaks to work with, you can find a selection of free breakbeats on SampleRadar.
How to split and resequence a sampled break

Step 1: We’re using Ableton Live here. Import the song with the source break into a Session View clip slot. Use Live’s warp tools (Beats Warp mode) to isolate and loop the break, then right-click/clip the sample. This is non-destructive. You might want to quantize the beat, but that depends on what the beat is and what you’re playing it against.

Step 2: There are now two paths we can take; this is the first. Load Simpler into a new track and drag the trimmed beat into the labeled drop area – the waveform will appear. On the far left of the Simpler screen are three modes – click Slice and Live will add vertical lines based on the transients in the beat. If this automatic slicing doesn’t do what you want, you can slice it by grid (note values) or manually.
Step 3: Now, when you play MIDI notes from a keyboard or drum pads, notes from C1 and up will trigger the slices, allowing you to create a new beat while preserving the sonic characteristics of the original, at any tempo. Turn on Poly in Simpler so you can trigger more than one drum hit at a time. This is a quick way to get a sample-to-slice beat, ready to use in your music.

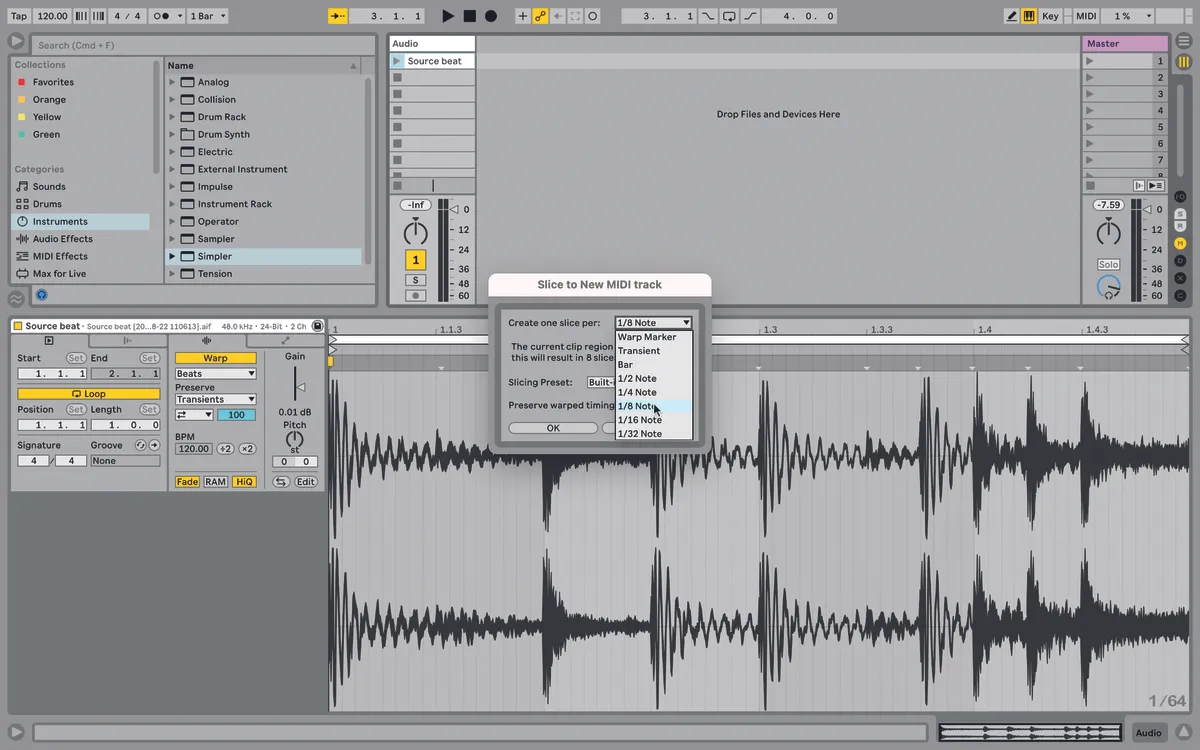
Step 4: Here is the second way. Right-click the source drum beat sample and choose Slice to New MIDI Track. You will see a field where you can enter values for the note length/slice and leave warping enabled – try some trial and error. A new MIDI track is created, with a clip containing a note for each slice and a Drum Rack with a Simpler device for each slice.

Step 5: Start the clip and check if it plays correctly. If not, adjust the playback positions of each slice—the Drum Rack macros include Start Offset and Loop Length controls—or reslice the original clip with different grid settings. If you can’t see the Simpler, click the Show/Hide Devices button to the left of the Rack, or double-click the appropriate drum pad.

Step 6: You can re-sequence this beat while keeping the original sound as you rotate it. Drag the notes horizontally to trigger the sound at different positions. Drag vertically to trigger different sounds at the same position. You could delete individual beats or use other MIDI editing tools or effects, including using the velocity editor below the notes to flatten or expand the dynamics in the beat.
Emulate the classic Akai sound in your DAW
How to recreate the classic sounds of Akai’s MPC60 and S900 or E-mu’s SP-1200 with modern plugins.

Step 1: Akai’s classic early samplers use a complex signal chain that includes input amplification, pre-filtering, AD and DA conversion, and post-filtering, and all of these stages affect the sound by introducing soft saturation, noise, and subtle aliasing. Still, to feel the full impact of these stages, start with some decent, high-quality audio.

Step 2: The most significant aspect of early samplers is undoubtedly their 12-bit resolution. This is significantly lower than the 16-bit or 24-bit we typically use to record audio these days. Nonetheless, it’s easy enough to use a bit reduction plugin, and many DAWs include these by default.

Step 3: Paste this plugin over a suitable high quality audio and gradually reduce only the bit resolution. You’ll notice subtle changes in the accompanying noise as you get down to 14-bit and below, and maybe even some swirling noise at the 12-bit setting. Try different sources to see how they affect you
the result.

Step 4: Sample rate is the next issue. With adjustable sample rates to maximize recording time, early samplers also battled sample aliasing with varying degrees of success, and actually created a rather unique sound in the process. In fact, the bandwidth of the S900 could be adjusted from 3kHz to 16kHz.

Step 5: Once again, your main tool is a simple plugin. If you reduce the sample rate, you’ll hear high-frequency artifacts creeping in, and this can really improve things like kicks. Control these artifacts with a smooth, non-resonant low-pass filter, adjusting the cutoff frequency to your liking.

Step 6: Despite its digital core, a sampler’s analog input circuitry can color the sound slightly. To recreate this, a simple analog channel emulation adding some subtle harmonic distortion should suffice. Finally combine all aspects in the steps to achieve the vintage sampler sound.
Strike out your cut breakbeat
Again, we use Ableton Live for this, but other DAWs are available! Not only can we sample audio beats, then trim, then cut and rearrange, it’s about options: we can edit them with audio effects and add entirely new sounds to the mix.
Since we’ve sliced the beat, we can reprocess every single beat instead of just the entire beat like we normally would. If you’re trying to capture a vibe from the past, the early days of sampling, you can even take a beat, trim it, and then have it play up or down depending on the project tempo, an effect often heard in the past when sampled tracks.
One thing you may struggle with is timing: this can be a huge part of why you want to sample a beat in the first place when it has a bit of swing, but it can cause problems when matched to programmed material will that is dead straight. You could deal with this by extracting the groove from the sample, which contains timing and velocity information, and applying that to programmed parts. Or you can flip that and quantize the sampled beat, straightening out the timing to better match the MIDI parts.
The only problem is that you then lose the timing variations that you liked in the first place. So why not be smart and just quantize that beat when it’s playing alongside programmed parts and it needs to be straight? Whenever the beat plays more prominently or even alone, don’t quantize it, let it be free and flexible. The best from both worlds.
Add new sounds to cut beats
You can embark on a self-contained beat-making journey, starting with a sliced source beat and perhaps going as far as “smoothing” the finished result onto a new sample if you simply want to migrate the result between different projects . DAWs or to a hardware sampler.
Housekeeping tools like EQ, gating, and noise reduction are very useful for cleaning up samples and sonic focus before adding other effects.
Equalization can eliminate unwanted frequencies, noise reduction software can be used to reduce or minimize intrusive background noise through the sample (this works best when you can find an isolated section where only the noise is present), and with gating you can adjust the decay of each individual disc.

Step 1: Each slice is contained within an instance of the Simpler instrument with its own gain control, allowing the gain of each hit to be balanced. Compressing individual hits will give them more weight. We like to use Compressor/Brick Wall on kicks, especially the first one in the bar.

Step 2: We can add effects to each slice; It can sound amazing to throw in a synced delay and let it fade away with the beat. If it sounds too dense, filter out the low end of the repeats. In the same way we can add effects like distortions or bit crushers.

Step 3: You can add instruments to specific slices. Use an instrument like Operator and experiment with different waveforms, filters, and release times for a short and clipped note, like a percussive sound, or hold for a longer period of time and fade out the rest of the beat.