
How to Install and Use the Ghost Blogging Platform on Raspberry Pi
Blogging platforms allow you to share your thoughts and opinions with the whole world – whatever your field or interests, you can get your know-how out there and have it read by thousands or even millions of people. Ghost is one of the best blogging platforms and content management systems available, and with a little effort you can use Ghost to create and manage a blog from your Raspberry Pi.
Why Ghost is one of the best blogging tools for Raspberry Pi
Ghost’s main claim to fame is its simplicity, and developers claim that the Ghost blogging experience focuses on providing the best possible writing and publishing experience. Unlike WordPress, where functionality is expanded with paid and free plugins, Ghost has most of what you need built into the basic package.
If you plan to monetize your blog, these tools can be invaluable and include the ability to publish to both the web and email newsletters. If you delve further into Ghost’s features, you’ll find that you can set up a membership system and paid subscriptions – you can easily turn your blog into a business.
Best of all, while Ghost offers scalable paid hosting for anywhere from $9 to $2,500 per month, the software is open source, which means you can download, modify, redistribute, or install it on your own hardware for free. We’ll show you how to install it on your Raspberry Pi.
How to install Ghost on a Raspberry Pi
Before you start, you must follow our tutorial on how to prepare your Raspberry Pi as a server. Once this is done, visit your registrar Advanced DNS settings page. Delete all records and create a new one A Recording. Set the host to “@”keep your public IP address and TTL as low as possible.
If you are accessing Ghost from a subdomain, e.g. guru, set the A record to “ghost” instead. Login to your Raspberry Pi using Secure Shell (SSH), then update any upgrades and installed packages:
sudo apt update
sudo apt upgrade
Now enable these two Apache mods and restart Apache:
sudo a2enmod proxy proxy_http
sudo service apache2 restart
Change directory and use nano to create a new Apache conf file:
cd /etc/apache2/sites-available/
sudo nano ghost.conf
…and enter:
<VirtualHost *:80>
ServerName ghost.your-domain.tld
ProxyPass / http:
ProxyPassReverse / http:/127.0.0.1:2368/
ProxyPreserveHost   On
</VirtualHost>
Save and exit nano with Ctrl + O then Ctrl + X.
Activate the conf with:
sudo a2ensite ghost.conf
…and restart Apache.
sudo service apache2 restart
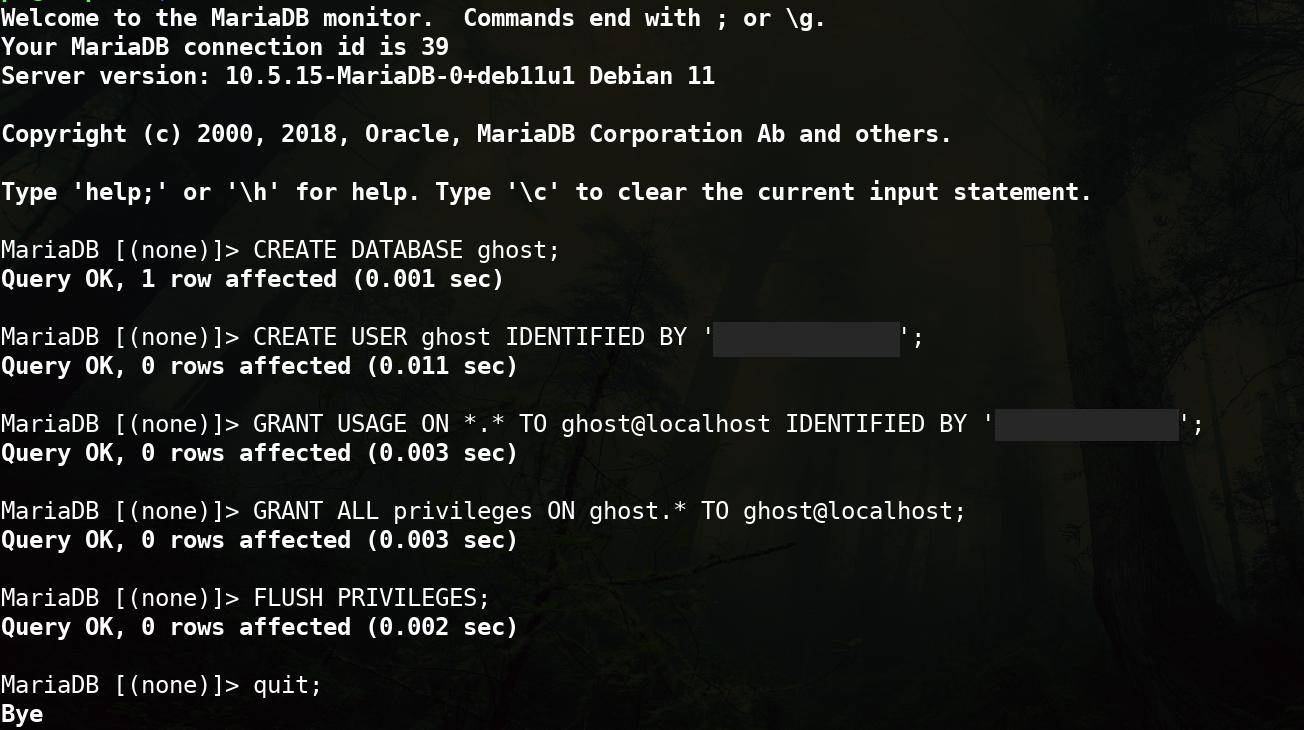
Add a database
Ghost needs a database to work, so type in MariaDB:
sudo mariadb
Create a new user called Ghost, a new database called Ghost, then allow the Ghost user to use the Ghost database:
CREATE DATABASE ghost;
CREATE USER ghost IDENTIFIED BY 'topsecretpassword'
GRANT USAGE ON *.* TO ghost@localhost IDENTIFIED BY 'topsecretpassword'
GRANT ALL privileges ON ghost.* TO ghost@localhost;
FLUSH PRIVILEGES;
quit;
Install Node.js
Change to your home directory and enable the NodeSource repository, then install Node.js and Node Package Manager (npm):
cd ~
curl -sL https:
sudo apt install nodejs
Input:
node
…should show your node version. In our case, the output is v16.17.0. Yours may be different.
Install Ghost
Use npm to install the Ghost installer tool:
sudo npm install ghost-cli@latest -g
Change to the directory and then create a new directory named Spirit:
cd /var/www/
sudo mkdir ghost
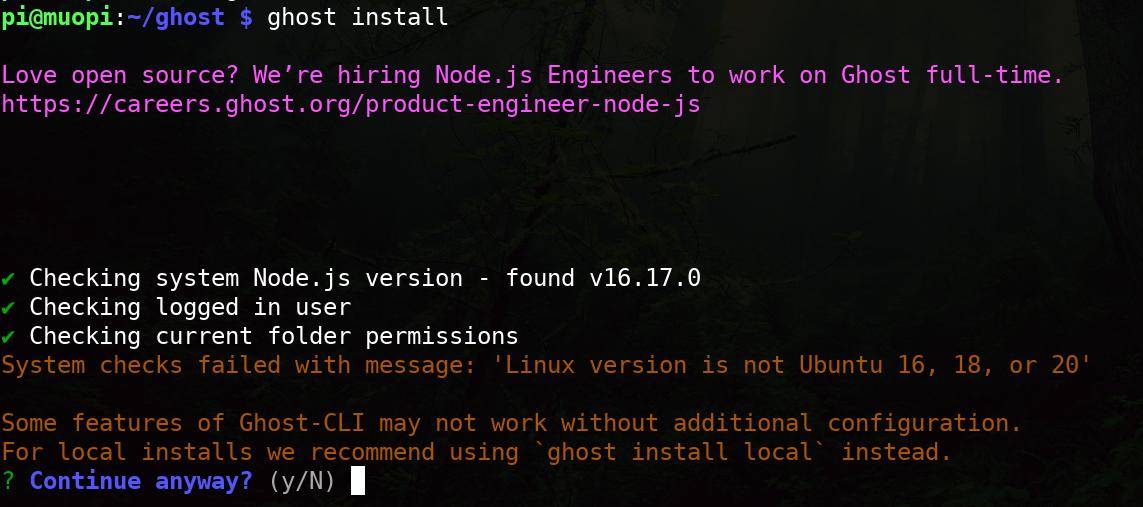
Change to the new directory and then use the Ghost installer tool to install Ghost:
ghost install
System checks fail with a warning that “Linux version is not Ubuntu 16, 18 or 20” but you can ignore this and enter j keep going. A second message warns you: “The local MySQL installation was not found or has stopped”. Keep your nerve and type j to skip the MySQL check and continue. Ghost will now download and install. On our test Raspberry Pi, this process took about 10 minutes.
Set up your blog account
Once done, you will be asked for your blog URL as well as details about your MySQL database. Since you installed MariaDB instead of vanilla MySQL, these details are what you set for MariaDB. Your hostname will be local hostis your MySQL username Spiritand the name of your MySQL database is Spirit, and the password is the fiendishly difficult database password you set earlier. When asked “Would you like to set up systemd”, type jthen j again when asked if you want to start Ghost.
Open a browser and visit your-domain-name.tld/ghost/. You will be asked to create the first account, so fill in the fields with the site name, your name, your email address and a password. Ghost insists on a password of at least ten characters; Make sure you create a strong and memorable password.
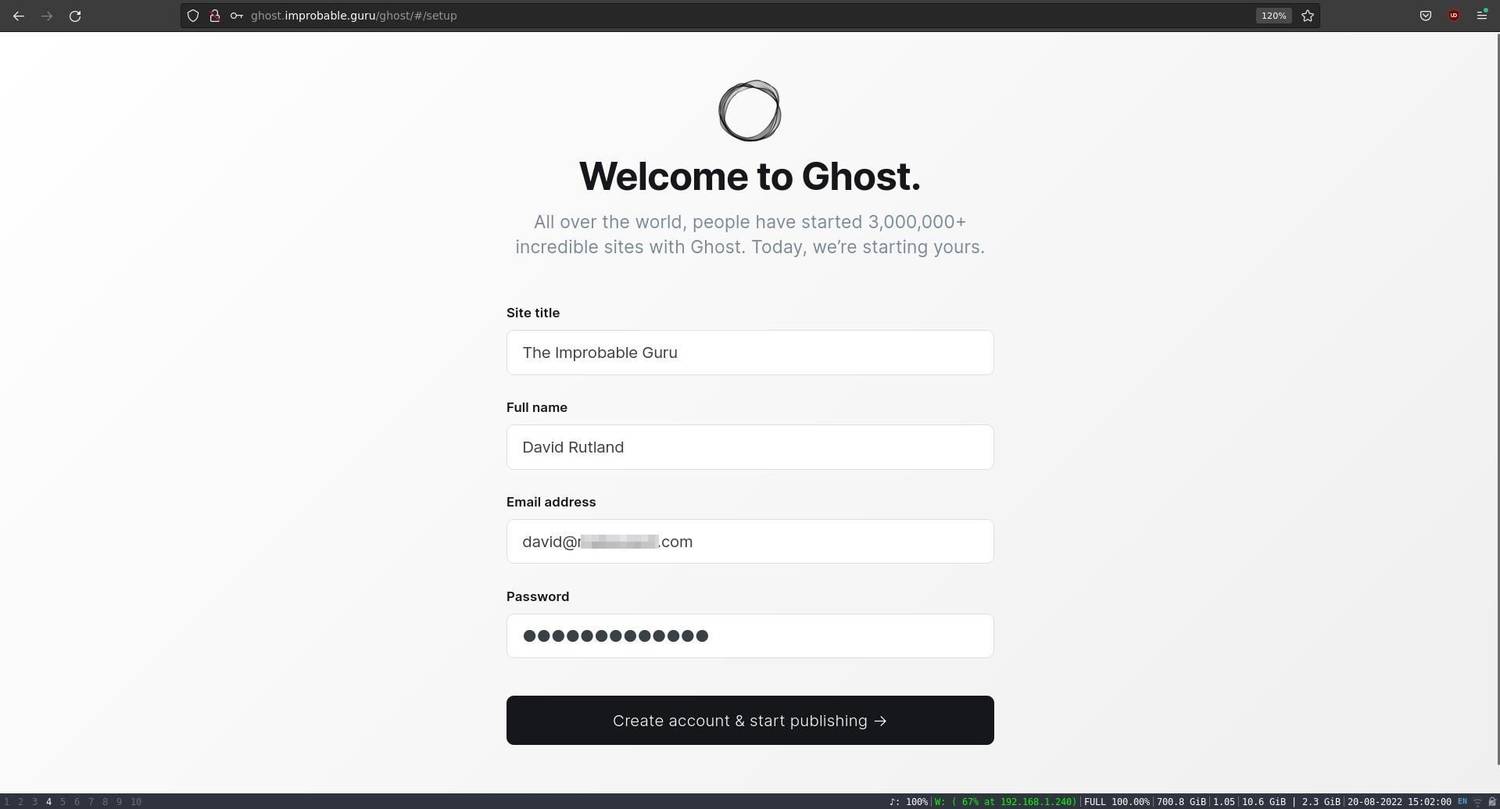
Click on Create an account and start publishing to go to your website. Once you do this, you will receive an email from [email protected] letting you know that your new account has been created.
Before proceeding, you need to secure your Ghost installation with SSL from Let’s Encrypt.
sudo certbot
Enter your email address when prompted and select which name you want to enable HTTPS for.
Certbot fetches and installs SSL keys and certificates from Let’s Encrypt. Now restart Apache:
sudo apache2 restart
If you reload the page in your browser, the connection to your ghost blog is secure and you will need to log in again.
Creating a website with Ghost on your Raspberry Pi
As the developers say, Ghost is very intuitive to use, and there will already be an auto-generated home page with your site title, a dummy post, and a readable “About” page, showing your Ghost site as an independent publication of Declared to you , and the date of introduction.

The admin page is accessed via your-domain.tld/ghost/ and the website management tools are on the right side of the screen. To create a new post, just click +. The editor itself is a minimalist WYSIWYG block editor similar to that of WordPress and is easy to use with no distractions.
From the dashboard, you can add members, create mailing lists, view engagement, and customize your ghost site.

You can easily install the ghost blogging platform on your Raspberry Pi!
Ghost is one of many easy-to-install self-hosting projects for the Raspberry Pi. It costs nothing to install and to run. Why not create a new blog based on your adventures in the exciting world of Raspberry Pi self-hosting projects?