Virtual LAN or VLAN technology can fail for a variety of reasons. VLAN connectivity issues can occur due to physical links, faulty Layer 2 data link configuration errors, or Layer 3 routing network configuration issues.
Here are some steps to troubleshoot VLAN connectivity issues.
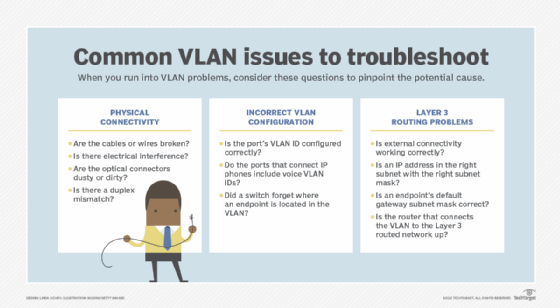
physical connectivity
For the network to work, there must be basic physical connectivity. Typical problems include broken wires or optical cables, dust or debris on optical connectors, poor connections, interference from electrical systems, or pinched cables.
Many of these problems manifest themselves as unidirectional connections, where packets go one way but not the other. Network devices can often detect unidirectional connections, making it easier to diagnose with simple commands, e.g show interface. Administrators need to review the interface status and error counters in the output to identify the specific nature of the problem.
Duplex mismatch
For slow Ethernet connections, check the duplex setting. Both sides of a connection must be configured for the same duplex setting—Auto, Full, or Half—and speed. A duplex mismatch can work at low packet rates and fail at higher packet rates, so don’t rely on a simple ping test. An interface that indicates late collisions communicates in half duplex with a full duplex interface. A full-duplex interface displays runt frames when the attached device is in half-duplex mode. The recommended setting for most devices is automatic.
Incorrect VLAN configuration
The most common data connection errors are misconfiguration of a port’s VLAN ID or omission of the voice VLAN ID on ports connecting IP phones. The connection looks good and the packet counters are increasing. But there is no connectivity. In this case, administrators should perform a simple configuration check.
trunking
For trunked connections, administrators must set the native VLAN, which tells the switch which VLAN to use for any frame that does not carry a VLAN ID. This ID is usually consistent across the network, and administrators only need to perform a simple configuration check.
Switch-to-switch links often use trunking to route multiple VLANs over a single link. The allowed VLAN list must match at both ends of the connection. A mismatch can result in isolated instances of a VLAN. Connectivity works for some endpoints and not others. Perform simple configuration checks on the switch trunk interfaces here.
The configuration checks above are ideal places to apply configuration validation automation. These reviews don’t need to make any changes—they just need to highlight potential problems for network personnel.
Forwarding loops in a switched network
Switched networks traditionally rely on Spanning Tree Protocol (STP) to prevent forwarding loops. But in some cases loops occur even with STP to prevent them. A loop quickly forwards Ethernet frames around the loop, consuming interface bandwidth and switch CPUs. It quickly causes a network to become so overloaded that it stops functioning. Unfortunately, because the CPUs and network connections are busy, it is impossible to use the network to diagnose the problem.
To troubleshoot, administrators should divide the network into smaller and smaller domains to identify the location of the loop. Split the network in half and identify which half contains the loop. Administrators can repeat the segmentation process until they identify the switches on which the loop resides and the interfaces that connect to each other. It’s a good idea to practice this in a lab setting to learn the process. Vendors have also developed features like Unidirectional Link Detection, Loop Guard, Root Guard, and BPDU Guard to prevent various types of loops.
Unicast flooding
In rarer cases, a switch can forget where an endpoint is located on a VLAN, leading to a situation known as Unicast flooding. This occurs when the switch’s media access control cache timer differs from the router’s IP address-to-MAC address cache of the VLAN. (An example is described in “Unicast flooding in switched campus networks“). The switch forgets which port a given MAC address is on, resulting in the switch flooding every frame destined for the MAC address to all ports on the VLAN. Several network topologies and scenarios can cause this flooding. If the affected systems send a lot of data, e.g. B. with a hard disk backup, all systems in the VLAN are heavily loaded.
Administrators can identify this issue when end systems on the affected VLAN become sluggish and packet counters on all interfaces on the VLAN increase at the same rate. One option is to set the MAC address to port timer slightly higher than the IP address to MAC timer. Alternatively, switch vendors have implemented features that help avoid the high load by limiting the number of unknown unicast floods. These are vendor-specific commands, so administrators should check with their vendor.
Common VPN problems include physical connectivity issues, incorrect VLAN configuration, and Layer 3 routing configurations.
Layer 3 (routed network) issues.
Another class of problems involves a VLAN’s connectivity to the rest of a Layer 3 network. In these cases, the VLAN is working properly, but its external connectivity is not working. If admins can ping at least one other system on the subnet, basic Layer 2 connectivity is working and it’s likely a Layer 3 issue. There are exceptions, so be open to alternative scenarios.
endpoint configuration
If the issue occurs with a single endpoint, verify that its IP address is on the correct subnet and has the correct subnet mask. Incorrect configuration can result from a typo in the configuration process or incorrect VLAN ID configuration on the endpoint’s switch interface, putting it in the wrong VLAN/subnet.
Observe the symptoms and determine whether the problem is at the physical layer, data link layer, routed layer, or application layer.
Gateway configuration
Administrators should be able to ping the default gateway on the subnet as well as neighboring systems on the same subnet. If neighboring systems respond to pings but the default gateway does not, then two possible scenarios are causing the problem.
The first option is that the default gateway is not configured correctly. This could be a missing virtual switch interface (SVI), or the router connecting the VLAN to the routed Layer 3 network is missing, misconfigured, or not in an operational state. Admins should next diagnose the SVI or router connection and after validation return to the failed endpoint. Further testing may require admins to revert to the Tier 2 testing scenarios described above.
The second possibility is that the endpoint’s default gateway subnet mask is incorrect. The symptom of this scenario is that the endpoint can ping some but not all other endpoints within the VLAN/subnet. Whether it can reach the default gateway and correctly redirect packets depends on the respective addresses. Again, automating network validation is a big help.
summary
Network troubleshooting is always best with a divide and conquer approach. Observe the symptoms and determine whether the problem is at the physical layer, data link layer, routed layer, or application layer. Determine where and why connectivity is failing, and then start reviewing specific items related to that layer. Test each potential bug to determine where the problem lies and identify what needs to be corrected. VLAN troubleshooting is a valuable skill learned through experience.