
How to turn on Do Not Disturb mode in macOS
Do Not Disturb on macOS
AppleInsider may receive an affiliate commission for purchases made through links on our site.
Do Not Disturb has been a feature of Apple devices since iOS 6, but Apple has since brought the feature to macOS. Here’s how to use it.
Notifications can be both a blessing and a curse. They help us to be informed about important events, e.g. B. an email from the boss. But when multiple apps send out notifications, they can quickly become overwhelming and important data can be lost.
With iOS 15 and macOS Monterey, Apple integrated Do Not Disturb into a new feature called Focus. Focus mode works similarly to Do Not Disturb, but users can adjust it for better fine-tuning.
Do Not Disturb works as usual, just in a slightly different location now.
Turn on Do Not Disturb on Mac
There are several ways to enable Do Not Disturb on Mac. The setting offers controls for notifications and phone calls, and users can configure them to turn on automatically.
- There is a in the top right corner of the menu bar square icon that looks like two gags stacked on top of each other.
- Click on it and select focus.
- Under Focus is Do Not Disturb. There is an option to turn it on for an hour or until “tonight”, which may depend on the time zone. Eastern time shows 7:00 p.m.
- A click on Focus Preferences opens the setting in it System Preferences > Notifications & Focusthis is the second way to find Do Not Disturb.
“Do not disturb” options
In the System Preferences view, the Focus tab has two menus, one called Allow notifications from. Clicking the Options button on the right will bring up options to allow time-based notifications, allow calls from different contact groups, and allow repeated calls.
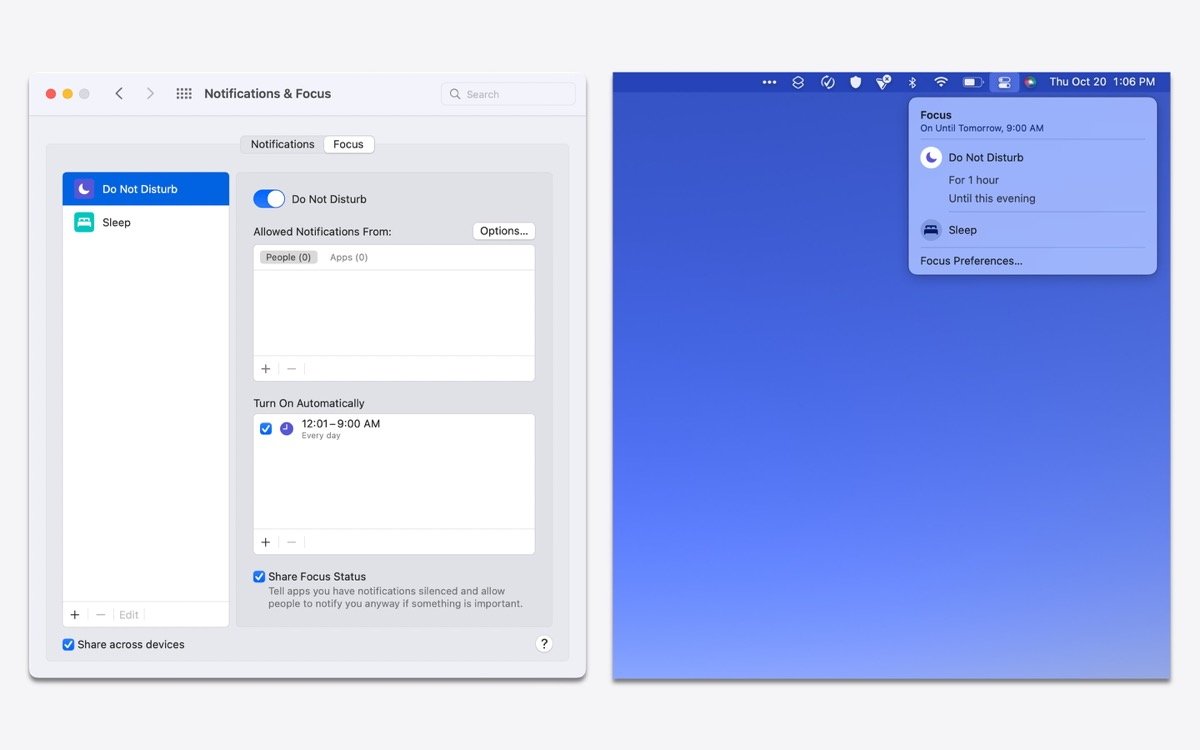
Users can turn on Do Not Disturb in System Preferences and in the menu bar
The Auto Turn On menu allows for three automation types when the plus button is clicked: Add Time Based Automation, Add Location Based Automation, and Add App Based Automation.
Adding a time-based automation creates a range of times and days when Do Not Disturb is automatically turned on. For example, users could turn it on Monday, Wednesday, and Friday from 9:00 p.m. to 9:00 a.m. Or other times and dates may be chosen.
By adding a location-based automation, Do Not Disturb will automatically turn on when a person travels to their chosen location, e.g. B. to work.
Finally, the addition of an app-based automation will enable Do Not Disturb when using select apps. It’s a great option for things like silencing notifications while watching a movie on the Apple TV app.
There are two check boxes at the bottom of the window in System Preferences. One, called Share Focus Status, tells apps that the user is muting notifications and allows users to still notify them when something important is happening.
The second checkbox at the bottom left of “Notifications & Focus” shares the “Do Not Disturb” settings with all Apple devices with the same Apple ID. The checkbox can also be unchecked to allow each device to have its own Do Not Disturb settings.